
A 200-vial sequence on a USP assay stopped at position 87 last Tuesday. The needle bent 0.4 mm off axis after hitting a cap septum that the datasheet rated for 100 punctures but had already cored through at 31. The autosampler vial datasheet specifications and what each value means are not a formality. They are the difference between a validated run and a service call. Most buyers read the sheet wrong because they cannot tell which numbers were measured on a CMM and which were copied from a mold drawing in 2008.
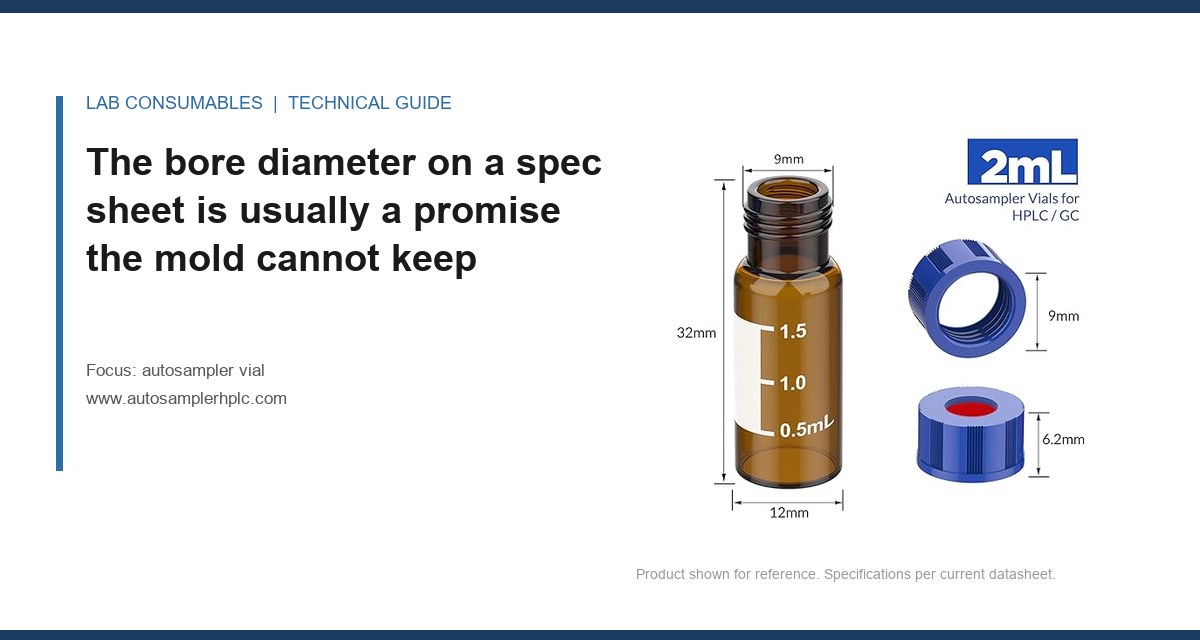
When a datasheet says 12 x 32 mm, the 12 is the outer diameter of the vial body, not the bore. The bore, the opening the cap actually seals against, is a separate number that cheap suppliers omit. I have measured incoming lots where the nominal 9 mm opening ranged from 8.92 to 9.11 mm across 500 pieces. That 0.19 mm spread is enough to change cap compression and leak rate. A sheet that lists only OD and height is not a specification. It is a shipping label.
Ask for the bore ID tolerance. On a quality 12 x 32 mm screw-top vial, the bore should be 9.00 mm ± 0.05 mm. On a 9 mm short-thread vial, the thread major diameter should be 8.00 mm ± 0.03 mm and the thread pitch 2.5 mm per turn. If the supplier cannot give you those numbers, they did not measure them. They are selling you a shape, not a component.
Wall thickness is tested, but only if the sheet says “measured at 3 points”
Wall thickness on a molded or drawn vial is never uniform. The bottom is 2 to 3 times thicker than the sidewall because the glass flows differently during forming. A datasheet that states wall thickness 1.0 mm without a location is giving you a nominal value, not a tested one. The real test is a dial indicator or ultrasonic gauge at three points: 5 mm below the shoulder, mid-body, and 5 mm above the base.
For a 2 mL screw-top autosampler vial, I expect sidewall between 0.9 and 1.1 mm. Below 0.85 mm, the vial flexes under cap torque and the septum does not seat evenly. Above 1.2 mm, heat transfer in a heated autosampler tray changes and the vial may not reach setpoint in time. The sheet should say wall thickness measured at 3 points and give the range. If it says only “1.0 mm,” treat it as a target, not a guarantee.
Septum hardness is a Shore A number, but the durometer reading is only half the story
A septum datasheet will list Shore A 55 or Shore A 45. That number is measured with a durometer on a flat plaque of the raw material, not on the finished septum. The finished septum has a PTFE facing on the bottom, which changes the effective hardness. A PTFE-faced silicone septum rated Shore A 55 will feel harder than 55 at the needle entry point because the PTFE layer is 0.1 to 0.2 mm thick and has a Shore D hardness around 55 to 60.
The number you need is puncture force. A good datasheet lists it in Newtons at a given needle gauge and speed. I have seen puncture force for a 23-gauge cone-tip needle range from 2.1 N to 4.8 N across two septa both rated Shore A 55. The difference was the PTFE thickness and the silicone crosslink density. If puncture force is not listed, you are buying on a proxy measurement that does not predict needle bending.
Coring resistance is tested by puncture count, but the count means nothing without the needle spec
A datasheet that says 100 punctures without coring is incomplete. The test is meaningless unless it states the needle gauge, tip style, bevel angle, and penetration depth. A 23-gauge cone-tip needle with a 12-degree bevel will core a septum much faster than a 26-gauge blunt-tip needle. The same septum might survive 150 punctures with one needle and 30 with another.
Look for a line that reads something like: coring resistance: no visible core after 100 punctures with 23-gauge, 12-degree bevel, cone-tip needle, 8 mm penetration, 45-degree entry angle. That is a tested value. If the sheet says only “100 punctures,” the supplier is quoting a material datasheet from the silicone vendor, not a test on the finished septum. I have rejected lots where the septum cored at 25 punctures because the PTFE facing was 0.08 mm instead of the specified 0.15 mm.
Cap torque is a range, not a single number, and the sheet should state the failure mode
Cap torque on a screw-top vial is typically 8 to 12 N·cm for a 9 mm short-thread cap. Below 8 N·cm, the septum does not compress enough to seal. Above 12 N·cm, the cap can crack at the thread root or the vial neck can chip. The datasheet should give the torque range and the failure mode at the upper limit. A cap that fails by thread stripping at 14 N·cm is different from one that fails by septum extrusion at 11 N·cm.
The test method matters. Torque is measured with a calibrated torque driver, not a hand capper. If the sheet says “finger tight,” it is not a specification. I have seen two operators apply anywhere from 6 to 18 N·cm by hand on the same cap. That spread causes intermittent leaks that show up as ghost peaks. If your lab does not use a torque driver, the cap torque spec on the sheet is the least of your problems.
The “certificate of analysis” is often just a retyped spec sheet
A real CoA lists the actual measured values for that lot: bore ID, wall thickness at three points, septum puncture force, cap torque at failure, and the lot number of the glass tubing. A fake CoA lists the same nominal values as the datasheet, with no lot-specific numbers and no test method references. I have held two CoAs from the same supplier, six months apart, that were identical to the third decimal place. That is not testing. That is copying.
Ask for the raw measurement data or at least the range and standard deviation for the lot. A supplier that actually tests will have a spreadsheet. A supplier that does not will send you the same PDF again. The difference shows up in your RSD. Lots with real incoming QC have injection RSD below 1.5%. Lots without it drift above 3% and you spend a week chasing the autosampler when the problem is the vial.
Dimensional tolerances on the sheet are not the same as dimensional capability of the process
A datasheet that says height 32.0 mm ± 0.25 mm is telling you the acceptance window, not what the process actually produces. A good mold or forming line holds height to ± 0.10 mm. A worn line drifts toward the edge of the window. The difference matters because autosampler trays have a fixed grip height. A vial 0.2 mm tall can sit higher in the tray and change the needle penetration depth into the septum.
Ask for Cpk or at least the process capability statement. A Cpk of 1.33 or higher means the process is centered and the spread is about half the tolerance window. A Cpk below 1.0 means the process is producing out-of-spec parts and sorting them. You do not want sorted vials. You want vials that were made right the first time. The datasheet will not tell you this. You have to ask.
Temperature ratings are nominal unless the sheet states the test duration and load
A vial rated -60°C to 200°C does not mean the vial survives 200°C indefinitely. It means the glass does not crack during a short exposure. The real test is thermal shock: a vial at 200°C plunged into a 4°C autosampler tray. That is what happens when you run a heated GC method and the tray is chilled. A vial that passes a slow ramp will fail a thermal shock test.
For headspace vial applications, the temperature rating is even more critical. Headspace vials are pressurized at 90°C to 150°C for 30 to 60 minutes. The datasheet should state the pressure rating at temperature, typically 2 bar at 120°C for a 20 mL crimp-top vial. If the sheet only gives a temperature range, the pressure rating is missing and you cannot verify the vial will not burst. I have seen a 20 mL headspace vial fail at 1.6 bar because the glass had a microcrack from the forming process that no one caught.
The ISO and GPI references on a datasheet tell you which dimensions are actually controlled
A sheet that says conforms to ISO 8362-1 is making a specific claim. ISO 8362-1 defines the dimensions and tolerances for injection vials made of glass tubing. It covers the 13 mm neck finish, the 20 mm crimp finish, and the 32 mm height. A sheet that says conforms to GPI finish 13-425 is using the Glass Packaging Institute thread standard. These references are meaningful only if the supplier can show you the measurement report against the standard.
Many datasheets list ISO and GPI references without testing against them. The supplier assumes the mold was cut to the standard in 2005 and has not been verified since. Molds wear. Glass tubing suppliers change. The standard is only as good as the last verification. Ask for the last mold verification date and the measurement report. If the supplier cannot produce it, the ISO reference is decorative.
Residual siloxane and volatile content is tested by headspace GC, but the sheet rarely gives the method
A vial datasheet for trace analysis should list residual volatiles or bleed level. The number is meaningless without the test method. A proper test uses headspace GC with the vial heated to 120°C for 30 minutes and analyzes the headspace for siloxanes, plasticizers, and other volatiles. The result is reported in ng per vial or area counts.
I have seen a datasheet claim low bleed with no number and no method. That is marketing. A real sheet says total siloxane bleed less than 5 ng per vial at 120°C for 30 minutes by headspace GC-FID. Without the method, you cannot compare two suppliers. One lab’s “low bleed” is another lab’s contamination source. For trace pesticide analysis by GC-ECD or GC-MS, the vial bleed can swamp the analyte signal. The gc vial you choose directly affects your detection limit.
How to spot a sheet that hides its test method
There is a pattern to datasheets that do not actually test. They use nominal values with no tolerances. They list material properties from the raw material vendor instead of finished part properties. They omit the test method for every line. They use words like “typical,” “approximately,” or “up to” without a statistical basis. They do not state the sample size for any test.
A real datasheet reads like a lab notebook. It states the dimension, the tolerance, the test method, the sample size, and the acceptance criterion. A fake datasheet reads like a brochure. It lists the same numbers every competitor lists and adds a few adjectives. The fastest test is to ask for the sample size and test method for one specific line. If the supplier cannot answer, the whole sheet is suspect.
Field case: the 31-puncture septum that passed the datasheet
A pharmaceutical QC lab running a 200-injection sequence noticed a sudden increase in carryover at injection 87. The peak area for the previous sample was showing up in the blank at 0.8% instead of the usual 0.1%. The needle was bent 0.4 mm off axis. The septum datasheet said 100 punctures without coring. The actual septum cored at 31 punctures.
The measurement that identified the problem was a puncture force test on the retained septum. The force at puncture 30 had dropped from 3.2 N to 1.1 N, indicating the PTFE facing had fractured. The silicone core was tearing instead of resealing. The fix was to switch to a septum with a thicker PTFE facing, 0.20 mm instead of 0.10 mm, and to verify the puncture force curve on every incoming lot. The datasheet had passed the septum because it only quoted the raw material puncture count, not the finished septum performance.
Field case: the 0.2 mm height drift that stalled a 96-well tray
A contract lab running a 96-vial tray on a UHPLC autosampler started seeing intermittent needle crashes. The autosampler would alarm and stop, but only on certain positions in the tray. The vials were from a new supplier that quoted height 32.0 mm ± 0.25 mm. The incoming inspection measured 30 vials and found a range of 31.85 to 32.18 mm. The mean was 32.02 mm, within spec, but the spread was the problem.
The autosampler gripper was designed for a height variation of ± 0.10 mm. Vials at 32.18 mm sat high enough that the needle hit the cap edge instead of the septum center. The fix was to reject the lot and require a Cpk of 1.33 or higher on height from the supplier. The new supplier held height to 32.00 mm ± 0.08 mm. The needle crashes stopped. The datasheet tolerance was not wrong. It was just too wide for the instrument.
What a spec sheet you can actually buy against looks like
Here is the minimum set of lines I require on a datasheet before I will quote a vial for a validated method. Each line must have a tolerance and a test method reference. If any line is missing, I move on.
- Bore ID: 9.00 mm ± 0.05 mm, measured with a pin gauge or vision system, sample size 50 per lot
- Wall thickness: 0.9 to 1.1 mm, measured at 3 points with an ultrasonic gauge, sample size 30 per lot
- Height: 32.00 mm ± 0.10 mm, measured with a drop gauge, Cpk 1.33 or higher
- Septum puncture force: 2.5 to 3.5 N at 23-gauge cone-tip, 12-degree bevel, 8 mm penetration, 45-degree entry
- Coring resistance: no visible core after 100 punctures under the same needle conditions
- Cap torque at failure: thread stripping at 14 to 16 N·cm, no septum extrusion below 12 N·cm
- Residual volatiles: total siloxane bleed less than 5 ng per vial at 120°C for 30 minutes by headspace GC-FID
- Thermal shock: no cracks after 200°C to 4°C plunge, 50 cycles, sample size 20
If a supplier sends me a sheet with all of those lines and the corresponding test reports, I will buy from them. If they send me a sheet with nominal dimensions and a logo, I will not. The difference in price is usually 10 to 15%. The difference in failure rate is 10x.
The decision rule
Buy the sheet, not the vial. A datasheet is a contract. If it does not state the test method, the sample size, and the acceptance criterion for each line, the number is nominal, not tested. Nominal numbers are for catalogs. Tested numbers are for validated methods. Your autosampler does not care what the catalog says. It cares what the glass actually does at position 87.
References & further reading
Related resources from our lab consumables network:
- Autosampler Vial at autosamplerhplc.com
- Vial at vials-filters.com
- Headspace Vial at headspacevialsupplier.com
- Gc Vial at gcvialfactory.com
External references and standards: